Uncategorized Nikki Uncategorized Nikki

A Christmas Playroom | Home Tour

Have you ever had (or have now) a room the is in-between every other room and serves multiple purposes? Rooms like that are some of the toughest to make a usable space out of; ours is about 90% done (still need a cool light) so I figured I would finally post it decorated for Christmas.

When we moved into our house we had a room at the top of the stairs, in the middle of all of the guest rooms. We had no kids yet, so it was the designated "man room". It was the one room Matt could put his posters and hunting decor in. It basically sat there, unused, with taupe walls and a beige hand-me-down couch that was ripping at the seams until we had baby #1. 
When we needed a nursery our office had to move to the man room. There was a niche that fit Matt's old garage sale desk perfectly. I loved the rough wood look of the desk, but took his childhood chair and painted it green to offset the wood. We also had some brown floating shelves that were moved next to the desk. When the walls were painted I took the white and painted the shelves, then added gold to the edges later.

 About 1.5 years ago I decided I was going to take that poor room into may own hands and start giving it a face lift. I installed a small chair rail and painted the walls white on the top and Benjamin Moore's Witching Hour on the bottom...while listening to reggae music and dreaming of a beach vacation. It made a HUGE difference in making the room feel larger and brighter! I will say that I wish I would've gone a little bit darker on the bottom, as this color can look slightly navy in certain light.  

I then tossed the couch and slowly started trying to make the room a usable playroom/man room/office. It really doesn't host the guys much, but I needed to leave up some of Matt's decor so he still feels like it's his house haha.

Then with baby #2 my large, brown Ikea shelf had to move out of the soon-to-be nursery. I didn't want it taking up precious wall space, so we used it as a divider. It felt so dark and heavy so I painted the outside white and it really helped to blend it with the walls. In order to make it toddler friendly we bought some threaded metal pipe and attached it to the wall, leaving a one foot gap in between the wall and shelf. We can now use the shelves from the room and the hallway, and the room feels like it's own space now rather than an extension of the hall.
There's a mix of man art and kid's art. I wanted to put a jack-a-lope in Julip's nursery but didn't want to pay so much for one. Then, I saw LayBabyLay's instagram with a paper mache one and found this tutorial to make it. I think Joni has since put up her own tutorial. 
Abram loves his Ikea table and chairs and his teepee that we got from Amazon. I added washi tape to the poles and some ribbon to the opening. I also took a small, useless table we inherited, cut it shorter, and attached a tray from Target to make it a usable side table with a little interest.
I hope you have enjoyed seeing it as we are enjoying actually being able to USE it! 
xo,
Nikki
Read More
Uncategorized Nikki Uncategorized Nikki

Master Bedroom Refresh | Home Tour

       It is my firm belief that a home is always evolving, much like life, change is the only constant. It can take months to years to develop a room if you're on a budget. Our home was our first out of college; actually I was in my master's program for 3 of the 6 years we have been here. We started out with very little money, very little time, and lots of hand-me-down furniture. We were so grateful for the furniture our families gifted us, but started to infuse our personalities and sense of style little by little.

       Our master bedroom was the first room we painted when we moved in {can't find a pic of the before right now}. Honestly, if I could paint all my rooms every year I probably would, but Matt HATES to do it. Over time I have been trying to make our bedroom look put-together on a small budget since it is not seen by others often.  Right before I had Abram I did a refresh and then again before I had Julip. I still loved the golden color, but needed something to brighten up the room and add some interest to the "focal" wall.

 
              Some of the biggest challenges were creating a cohesive look with a mixture of pieces obtained at various times, and combining the masculine and feminine touches so that my husband feels like it is his room too. The picture above the bed is actually a Persian rug of the Iranian army from the past. Matt bought it on one of his trips to visit family in Iran before we ever lived together. For a while it resided in his "man room", but got kicked out when it had to become more of a play room.  Matt was a good sport and said it could go in storage, but I thought it would be nice to have something more grande over our bed. He was thrilled! It helps to balance out the floral elements and now I think of them as our personal army watching over us while we sleep. ;)

       All of our furniture and finishes have to stand up to kids and dogs. The bedding was something that was a real challenge for us since our 65 lb. hound dog sleeps with us. She has black hair than can show easily on white bedding, and anything too delicate gets beat up pretty quick. I know I know...we need to stop the bad habit, but we are softies. We found the turquoise quilt at Target and it was perfect! It can add a pop of color to the room, or be flipped to the other side for a fresh, textured white. I got the bench at Garden Ridge, in high school, when it had zebra fabric. I covered it with this faux leather my Senior year, and have been wanting to cover it again. Until I get the time, I settled with throwing this fur rug from Marshall's on top.

       The dresser was a craigslist find. I actually got it over another woman because the seller was so aggravated that the other woman kept shoving it in her face that she was a designer...shhh don't tell. I ended up telling her my secret when I picked it up and we had a good laugh. I got the bedside tables from Homegoods and they were two different colors. I painted them and changed out the knobs with some found at Hobby Lobby. The lamps and basket are also from Homegoods {a long time ago}, and the mirror is from Ikea.

       The white framed pictures are of our parents and grandparents wedding days. They were all framed for our wedding and were then put on our wall, along with my "key to my heart" graphic.

Still on the wish list:
- Another piece of bedding to layer with the quilt
- A possible rug to add some texture
- A different fan that adds some style
- Cover the bench
- Possibly cover the headboard
- Rearrange/add art to the dresser

 xo, Nikki

Read More
Uncategorized Nikki Uncategorized Nikki

Don't Stop Make Believin' Nursery | Home Tour

       A full 6 weeks after having our little girl I finally "finished" her nursery. If you've seen my first nursery for our son, you know that I try to mix and match elements to allow the room to evolve so it is never really finished. I also don't love specific themes, just general ideas to give me direction. My son's nursery was all about adventure and being "wild and free". I seriously thought about doing a gender neutral nursery this time around, but quickly realized that this may be my only chance to be "girly".
       When I had just found out I was pregnant, and didn't know the sex, I walked into West Elm and fell in love with the displays of moss, butterflies, and lights. I didn't want a woodland themed nursery, but there was something so ethereal and imaginative about the feel the display created. I really wanted my daughter to use her imagination, so I thought of "make believe" as a general guide to help me in my decision process. Starting with an idea is sometimes harder than finding a piece of artwork or fabric. I knew I wanted a purple, mint, blush pink, white,and I was obsessed with a black and white dot patterned wallpaper so I made an inspiration board to get started.
       Matt would not let me wall paper so I started painting dots on the wall, in black {bigger than I originally wanted}. After we finished an entire coat I felt like the black was too harsh against the mint since I wanted the room to feel fresh. I decided to change them all to gold and to paint the dresser {inherited from my great grandmother} a dark, moody purple so it would pop.
       The nursery has a mermaid, a dancing bear, a prince frog, a flamingo in boots, toy baskets that remind me of something at the bottom of the ocean, a mad hatter hat, twinkle branches, feathers in "bubbles", a mirror on the wall, and rocks I collected as a kid.
              Mixing pattern, texture, and several colors will allow me to transition things in and out as she grows. The song quote above the crib is not only a play on the "theme", but also ties into our Louisiana roots; the LSU band plays it at every football game. I think it all came together nicely and is girly enough without being "princess."

xo, Nikki
Read More
Uncategorized Nikki Uncategorized Nikki

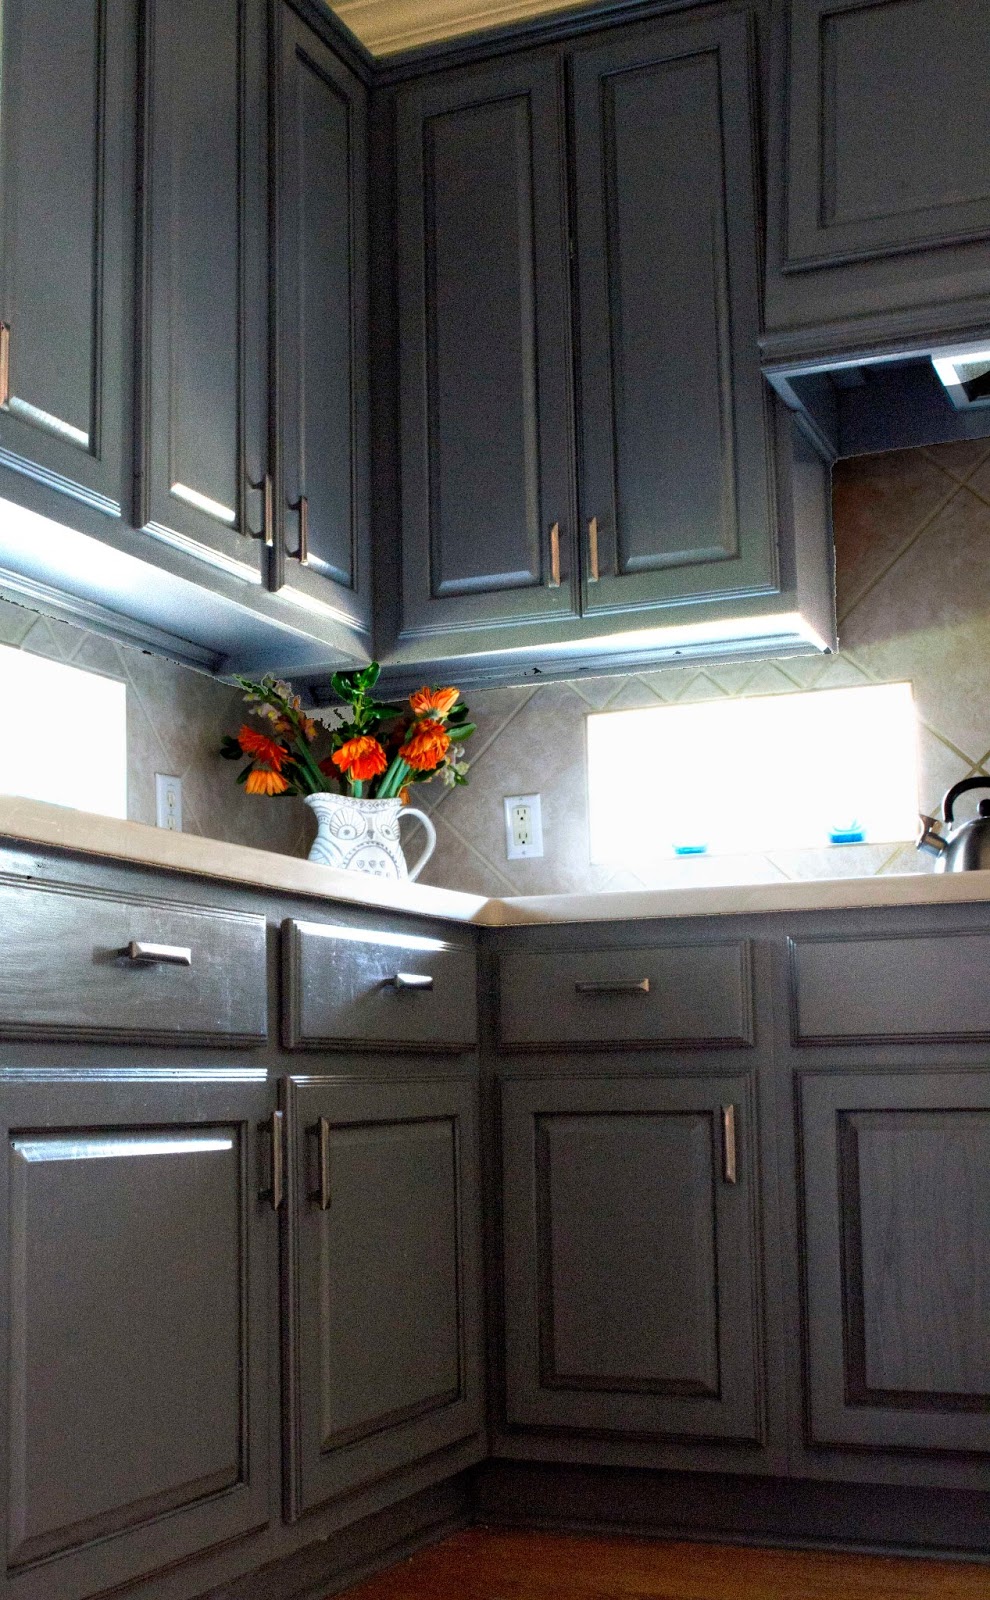
D.I.Y. Updated Kitchen Cabinets (Part 2) | Home Tour

       When I ended part one I was still sulking in the corner of my kitchen, staring at my DIY disaster. Luckily, there is an easier alternative to sanding...PAINT! I have never been opposed to painted cabinets but since we already had all white appliances, white counter tops, and white-ish back splash...white was out of the question. I didn't want something as dark as black. I LOVE colorful cabinets, but {like most of my projects} I consider both my "style" and resale to a certain extent since I know this will not be our house forever. Then I saw a picture of this home online and became obsessed with how good the dark gray with white counter tops looked. I didn't want them to look too modern for our traditional/contemporary style home, so I decided I would used a glaze to give them a little of an "antiqued" look.

       We had already sanded, so we no longer needed to do that step....just degrease and wipe them down with a damp cloth. We were advised to use an oil-based paint because it is more durable. Little did I know that latex paints have made big steps over the years....

TIP 1: As you take off your doors/drawers, find a way to number them in order to make sure you know where to put them back. Also put all hardware in a ziplock bag to make sure it doesn't get lost in the D.I.Y. craziness.
TIP 2: If you are painting your cabinets white, use a primer and then latex paint...oil-based white paints tend to yellow over time.
       Our oil-based paint was much thicker than the oil-based primers I have used; it took FOREVER to dry because it was cold. The brush strokes and bubbles from the paint were also showing when dry. 
TIP 3: If you have access to a paint sprayer, it may be messier but is well worth it since it saves you time and you avoid brush strokes {although I am sure they come with other problems}...my mom informed me once our job was done that she had one...not cool Debbie.
TIP 4: To thin oil based paint or primer in the winter and extend its drying time in the summer use a product called, Penetrol...it worked wonders! We couldn't see out brushstrokes afterwards.
TIP 5: Do NOT shake oil-based paint/primer to mix it before painting! Shaking will cause the bubbles, while stirring it with the paint sticks leaves it much smoother.
       We taped up the cabinets and rolled the paint on with a small foam roller made for cabinets, and would then quickly go over it with a high quality brush to take out any bubbles and fill in the corners/cracks. After each use we would just throw the roller and clean the brush WELL with mineral spirits. I also wore a respirator mask and gloves because I found out I was pregnant half way through this project and was cleared by my doctor to paint that way. Lightly sand in-between the two coats with a 220 grit sand paper. 
TIP 6: Take your time and use good lighting so you can see and correct any mistakes BEFORE the paint dries. 
       Read the back of your paint can to see how long you need to wait between coats. If I could do it again, I would do 2 coats of primer and 2 coats of latex in the color of my choice {semi-gloss for a little shine or satin for a more matte finish; sanding in between coats}.
       For antiquing, I bought one container of clear glaze from Lowes and mixed the amount directed with a sample size of the Valspar "almost black" paint because my gray was so dark. I antiqued the creases of the cabinets, drawers, and trim using a triangular sponge and a dry cloth for wiping. 
TIP 7: The more glaze you mix with the paint, the thinner it will go on...the less glaze you use with the paint, the thicker it will go on and less it will wipe off.
TIP 8: Experiment glazing with a small section {maybe hidden} to see what affect you want...keep a damp cloth with you to wipe off immediately if you don't like it.    
       To cap it off and make sure everything stays in place, I did two coats of Polyurethane, in Satin finish...always put a clear coat on furniture and cabinets. 
TIP 9: Make sure the clear coat you choose does not yellow over time, especially if you are using white/light paint.
       To avoid the modern gray/chrome/white kitchen look, we chose a dark metal/copper drawer pull from Lowes...and I LOVE it! Done and will NEVER do it again...at least in this house. Hope this helps you in your future kitchen re-do's. Painting the cabinets is an in-expensive way to update your kitchen quickly.
Paint color: Walmart- Chimney Smoke- Satin
Glaze from Lowes mixed with a sample of customized black valspar paint
Polyurethane water-based clear coat in Satin
Cabinet pulls: from Lowes
Recommended primers: Zinsser Oil-based Primer (high odor though) OR
Kilz Oil-based Odorless Primer (less odor)...or you can use water-based
Recommended Clear Coats: (based on others tutorial recommendations) Varathane Interior Water-based Polyurethane

Read More
Uncategorized Nikki Uncategorized Nikki

Wild and Free Nursery | Home Tour

After all my hard work...it is DONE...and is now my favorite room in our house full of halfway done projects!
A room to grow in...

       When I started thinking about a nursery I knew I didn't want a specific theme. I hate themed rooms in my house; I get bored with them quickly. We didn't know yet whether we were having a boy or girl, but we knew we wanted the bright dog paintings my friend, Logan, painted for me. Our dogs are our babies and we liked the idea that although they were no longer physically with us, they could watch over our new baby and keep him/her safe.

       Before I found out we were having a boy I saw an awesome grey and yellow plaid fabric at Hobby Lobby...so I then began praying for a boy so I could use the fabric haha {half-way sarcastic}. Prayers answered...thanks God, you have gotten me one step closer to finishing the nursery.

the plaid fabric was used for the crib skirt (diy coming soon...)

       I, like most people these days, love the look of vintage and modern mixed. I love color and when patterns, color, and texture mix in an interesting way. I really had no direction besides that...I just kept saying that I wanted it to be a room for a boy. I began trying to incorporate everything we love into his room and hoped it would somehow create unity when combined{oh ya I have an eclectic taste}. A little bit of animal fun {our dogs and pigs bc I'm obsessed), hunting {Matt's love}, patterns, travel, planes {Matt's other love}, rustic, etc...our little one's well rounded boy room. Hope you like!

Read More