

A Christmas Playroom | Home Tour
Have you ever had (or have now) a room the is in-between every other room and serves multiple purposes? Rooms like that are some of the toughest to make a usable space out of; ours is about 90% done (still need a cool light) so I figured I would finally post it decorated for Christmas.


About 1.5 years ago I decided I was going to take that poor room into may own hands and start giving it a face lift. I installed a small chair rail and painted the walls white on the top and Benjamin Moore's Witching Hour on the bottom...while listening to reggae music and dreaming of a beach vacation. It made a HUGE difference in making the room feel larger and brighter! I will say that I wish I would've gone a little bit darker on the bottom, as this color can look slightly navy in certain light.

I then tossed the couch and slowly started trying to make the room a usable playroom/man room/office. It really doesn't host the guys much, but I needed to leave up some of Matt's decor so he still feels like it's his house haha.


Free Christmas Printable
Happy Cyber Monday! I hope everyone enjoyed their Thanksgiving holiday. We always go to visit my family...9 hours away (10 with kids). I just got in late last night and am playing catch up today.


Before I left last week, I decorated the playroom (which is about 90% finished) for Christmas. Included in the decor were some simple Christmas prints I made. While I am busy editing the playroom pics to share later in the week I figured I would "gift" everyone the Christmas prints just in case they need one last thing to finish off their Christmas decor. Just click on the picture to pull up the 8 x 10 pdf printable. Need a larger size? Email me (under the contact tab) and I will get it to you.


xo,
Nikki
Master Bedroom Refresh | Home Tour
It is my firm belief that a home is always evolving, much like life, change is the only constant. It can take months to years to develop a room if you're on a budget. Our home was our first out of college; actually I was in my master's program for 3 of the 6 years we have been here. We started out with very little money, very little time, and lots of hand-me-down furniture. We were so grateful for the furniture our families gifted us, but started to infuse our personalities and sense of style little by little.


Our master bedroom was the first room we painted when we moved in {can't find a pic of the before right now}. Honestly, if I could paint all my rooms every year I probably would, but Matt HATES to do it. Over time I have been trying to make our bedroom look put-together on a small budget since it is not seen by others often. Right before I had Abram I did a refresh and then again before I had Julip. I still loved the golden color, but needed something to brighten up the room and add some interest to the "focal" wall.


All of our furniture and finishes have to stand up to kids and dogs. The bedding was something that was a real challenge for us since our 65 lb. hound dog sleeps with us. She has black hair than can show easily on white bedding, and anything too delicate gets beat up pretty quick. I know I know...we need to stop the bad habit, but we are softies. We found the turquoise quilt at Target and it was perfect! It can add a pop of color to the room, or be flipped to the other side for a fresh, textured white. I got the bench at Garden Ridge, in high school, when it had zebra fabric. I covered it with this faux leather my Senior year, and have been wanting to cover it again. Until I get the time, I settled with throwing this fur rug from Marshall's on top.


xo, Nikki
Free "Don't Stop Make Believin'" Printable
Whenever I make simple graphics for my rooms I like to make them available to anyone so they aren't limited in created their dream space. I made a couple versions of the "Don't stop make believing" art print above the crib in my Make Believe Nursery.
You can download the 8x10 PDF by clicking the name above the image.


Nursery 2 Details
This nursery was a guest room and the room where junk came to collect. I do everything on a budget so when I wasn't re-using pieces from Abram's nursery I tried to DIY or buy from discount stores.
We moved the full size bed into Abram's room with a new frame {his toddler room update is coming soon}, and moved his crib into the nursery. I also used the glider we had in his room and shopped my house for other decor.


Paint Color: Benjamin Moore "Creme de Mint"
Ceiling Fan: Modern Fan Company Halo Energy Smart Fan
I really wanted a chandelier like this one from Ikea, but it was too long. Then I a few more options like this one from Etsy. We were going to do a separate table fan since the room is upstairs and it gets HOT in Texas. After doing some research and not feeling comfortable with the fans and little kid's fingers, we went with this modern fan. We LOVE it! You can barely tell it's a fan because of the way the blades are mounted.

Crib: Jenny Lind Davinci
Crib Sheets: Land of Nod
my alternate {not pictured}: Etsy
Pillow in Crib: H&M
Curtain Rod: Ikea


Throw Blanket: Ikea
Frog Statue: TJ Maxx {also saw at Home Goods}

Paper lining back of shelf: Paper Mojo adhered to some matte board and inserted behind the shelf.

Alice in Wonderland Babylit Book: Amazon
Alice in Wonderland Hat: Etsy and I love that she can use it for dress up later.
Cup and saucer: Hobby Lobby and I will be replacing those with some handed down from Matt's grandmother.

Picture: Matt ordered the "Mother's Love" print from Kelli Murray and this came as a free gift {smaller than the one for sale}. I loved it so I framed it for our baby girl. {Frame from TJ Maxx}

Glider: Walmart
Fur rug: Marshall's


Rocks in frames: When I was younger I was a HUGE rock collector. My box full of smaller rocks has been sitting in the attic for years, so I pulled it out and used some of my collection as the decor in some shadow box frames from Ikea.
Toy Baskets: I really wanted some type of toy baskets that weren't a typical shelf so I found some large candle holders at Garden Ridge, painted them gold, and mounted them sideways to the wall. They remind me of something you would see at the bottom of the ocean.
There you have it; Julip's nursery details! If there is something I missed feel free to email me!
xo,
Nikki
Don't Stop Make Believin' Nursery | Home Tour


Maternity Session for Baby #2


xo,
Nikki
Father's Day Weekend & Nursery Update

When I met Matt in high school I knew he was a good person, but had no idea whether or not he would be a good dad. Then I saw him with our dogs. He is the doggy daddy that randomly brings home treats and toys because he sees something they "need", and yes they have always had a stocking for Christmas. Matt is as soft-hearted as they come. He hates that Bijou {our 65 lb hound} sleeps with us, but doesn't have the heart to kick her out of the bed. It sometimes gets to me that I am more of the disciplinarian, but having a loving husband who truly cares about everyone around him makes me feel so lucky! He has been the same way with Abram as he is with our dogs, and I know he will show "Pixie" how much a dad can love a daughter.

He "never" {his words, not mine} gets to go fishing anymore now that we live in Texas, so I let him spend Friday fishing with his brother and dad while I worked...easiest gift ever ;). Truth...Abram had bought him a fish fryer and cajun cookbook for Father's Day and wanted him to be able to use it. Me wanting homemade fried fish had nothing to do with it...maybe.

Saturday we dove straight into the rest of the celebrations with a 1st birthday party for one of Abram's future best friends. It was at a beautiful little park and all the kids LOVED running around playing. I loved the ice cream...


Afterwards we made our way to Ikea. Abram passed out at the store while Matt and I searched and searched for some shelves/storage for the nursery. I swear this has been the HARDEST room I have ever put together. It felt good to stock up on items I may or may not need...just to feel like I accomplished something felt great! Abram rode his sister's shelves out of the store. Today I decided I didn't like them anymore, then decided I did...see what I mean...pregnant women shouldn't design their own nurseries; it is bad for everyone involved.

After our 1.5 trip to Ikea, which felt like we broke some speed shopping records, we needed a refresh so we headed to meet my parents for the last crawfish of the season and a little live zydeco music. We chowed down and danced until the place shut down. Abram had his first crawfish and danced his first Cajun dance. He spent the rest of the night throwing rocks and strutting across the lot to pick them up. He is amazing us by how fast he is learning the world around him, and by how fast he is learning to control those around him.


Progress:
All the walls are painted {including the focal wall}
The fan has been installed
We primed and put the first coat of paint on the dresser/changing table
Picked out shelving {hopefully it will stay}
Moved the rocker and crib into the room
Still To Do:
Finish picking/buying/painting artwork
Finish painting dresser
Install shelves
Pick/make rug, curtains, bedding
Finishing touches
....
Weekend Project: Recovered Accent Chair
I inherited a fabulous bedroom set from my Great Grandparents after they passed away. I love love love the lines of the furniture, but the yellow-white color...not so much. I am trying my best to hold off on repainting most of it to not upset my grandmother {for now}, but the chair that came with the set needed some help asap.

Step 1:
Disassemble. If the assembly is complicated, photograph the pieces as you take them apart. I unscrewed the legs from the back and seat.
Step 2:
I went ahead and spray painted the first coat on the the legs so it could dry while I upholstered the fabric pieces.
Step 3:
My seat and back padding were in good condition, and my fabric was a neutral so I left it all on. BUT, if the fabric or padding are in poor condition, then you will need to take that apart and replace it. If not, just do what I did and use a staple gun to attach the fabric {pulling it tight so there are no wrinkles}.

Step 4:
If the paint is dry enough, apply a second coat of the spray paint.
Step 5:
I needed a trim piece to hide my staples so I found a rope type of trim and simply hot glued it into place.

Step 6:
ASSEMBLE! Now have a seat and sip on something yummy...it is the weekend right?!


The hutch we were "Pregnant" with...Real Life DIY
Once upon a time, when I was just staying home with my little man our friends asked if I would refinish some furniture for them. Of course, I didn't hesitate to say yes...and 1 month later I landed myself a full-time design position.
I still wanted to do the furniture, so we started with their hutch. It was an old wooden piece that was given to them and they just wanted to see if it could be spruced up to look a little more "Pottery Barn" and a little less "visiting grandma's".

After sanding and dis-assembling everything it was time to prime. Matt had gotten me a paint sprayer for Mother's Day and we were pumped to try it out! It was amazing! It covered the piece so quickly and coated it so much better than a paint brush. I am now a big fan, but I will say for small projects I don't use it because there are so many parts to clean after each coat. Anyway we were thinking this would be done in no time.
Long story short, the paint was having trouble sticking in some places and it ended up taking us 2 coats of primer and about 3-4 coats of paint {w/ primer in it} to get it covered. We also had to deal with our work hours {we could only work on weekends} and the weather {can't paint in rain or below 60...and it was winter...not smart}.
After the paint cured I lightly sanded the areas that would naturally get more wear to make it look distressed. I also painted the back wall of the display cabinet a light gray to compliment her walls. Then we clear coated and re-assembled; adding some glass knobs we found at Hobby Lobby.

After almost 9 months we could finally gift them their hutch...only weeks before her second baby was due!

That, my friends, is real life DIY; some projects are wins and some are giant fails. Most of mine eventually end up as wins, but not before tons of tears and little fails along the way...don't give up! If you want any tips on our process or how to achieve this look, feel free to contact me by clicking the link at the top of the screen.
xo,
Nikki
Nursery Inspiration Board

Weekend Project: Easter Garland

I love holidays and my mom always had a way to make them feel special. It wasn't necessarily the decor that she did; it was the activities that created the memories. The only holiday I really decorate full-out for is Christmas, but I like to put up a few things for the others that can be stored easily. I had NO easter stuff that wasn't a hand-me-down from my mom's "don't want" pile so I decided to whip up a couple quick and easy garlands to hang over the baskets this year. Who wouldn't love some yellow chicks and fluffy bunny tails for Easter!?
I'm not a fru-fru person so I wanted to keep it simple with these, and although I love paper garland, I have worked with them a bit on the photoshoots I used to design the backdrops for and they were sooo difficult to manage when not hanging up....enter the pom poms and foam shapes...so much easier.
I made these while Abram was napping and when he came downstairs he quickly pointed and said, "Balls" {his favorite}, then he sat there admiring them for a few minutes and it made the little bit of effort I put into making these worth it. He is the critic/admirer I care about the most.
Supplies:
- Pack of any color {or mixed color} pom pom balls- got mine from Hobby Lobby
- Foam shapes- You can either make your own or buy them from a store- I got these chicks from the dollar section of Target, but have seen them at Hobby Lobby too
- Some type of string- I used twine because I had it laying around, but any slim string will do
- Scissors
- A sewing needle with a hole large enough for your string
- Hot glue if you feel like securing the pieces in their place


For my "Peter Cotton Tail" garland: I threaded my twine through the needle, sat in my favorite living room chair, and just started poking it through each pom pom until the bag was empty...it was my most "old lady" moment in awhile and I sort of loved it! Then just space as far apart as you want and DONE!


xo, Nikki
Weekend Project: Ikea Highchair Hack
Being a busy working momma I totally understand the stress of doing nothing during the week, and then assigning the projects for the weekend. I always feel so much more accomplished when I can actually complete something in a weekend so I have decided to do a new series of posts that will show the projects I have done that can be completed in one weekend or less. I will try to post projects and crafts that only take a few hours, but some may take more...but let's face it, we want to ENJOY the weekend as well.
First on the list....

This is soooo late {blah blah same song, different day}, but I never did post about Abram's highchair and I am so in love with this thing that I feel it is a must! I had gotten one of those expensive, padded highchairs when I registered and was so excited about my registry score...but then I panicked hard! It was so padded and big. It would take up so much room in my kitchen and wasn't the most attractive thing on the planet. I could not afford those stylish expensive chairs though; it just wasn't in my budget at the time. Then I started reading reviews on padded chairs and how hard they are to clean EVERY MEAL, and then saw this post and my thoughts shifted as to what the perfect high chair would be for our family.
1) Easy to clean
2) My son was a hot baby, so extra padding= extra sweating= extra fussing
3) Affordable
4) As Compact as possible
5) Not an eyesore

Enter the $25 Ikea highchair from the post. I hated the legs so the spray paint idea was genius...not my genius {hers}, but everyone gets their inspiration from somewhere. I did a test of a copper, gold, and rubbed bronze legs. All three would be amazing so take a peek at this pic, but for our eating area I chose the gold. Just tape off the ball feet and spray.

After that was finished all I had to do was decide what decal would grace the back of the chair. I am obviously NOT a monogram person because it took about 3 seconds for me to realize that Abram's initials would be the Texas A&M logo and as LSU fans there was no way that was gonna happen. So the next 2 ideas were a fork and spoon decal {hard to find the right size}, or the "eat" decal which won. I got it from this etsy site, and had her do it custom, at 6.5" wide, and you can pick from her many colors to go with your decor {I chose mint}.

We LOVE it over 9 months later. Abram has had no problem sitting in this chair. The tray can detach, but we leave it attached most of the time. Whenever he gets older we can pull it up to the table without a tray. The legs come off if we have to bring it out of town. It is light as a feather so sometimes he gets living room meals if I feel lazy {don't judge}. I just clean it off quickly after every meal with the Honest Brand cleaner we have, but since it is white I sometimes have to bleach after foods like carrot juice. And for the big messes we swiftly carry it outside and unleash the hose. AND since it is only $25 baby #2 can have her own ;).

D.I.Y. Updated Kitchen Cabinets (Part 2) | Home Tour


We had already sanded, so we no longer needed to do that step....just degrease and wipe them down with a damp cloth. We were advised to use an oil-based paint because it is more durable. Little did I know that latex paints have made big steps over the years....
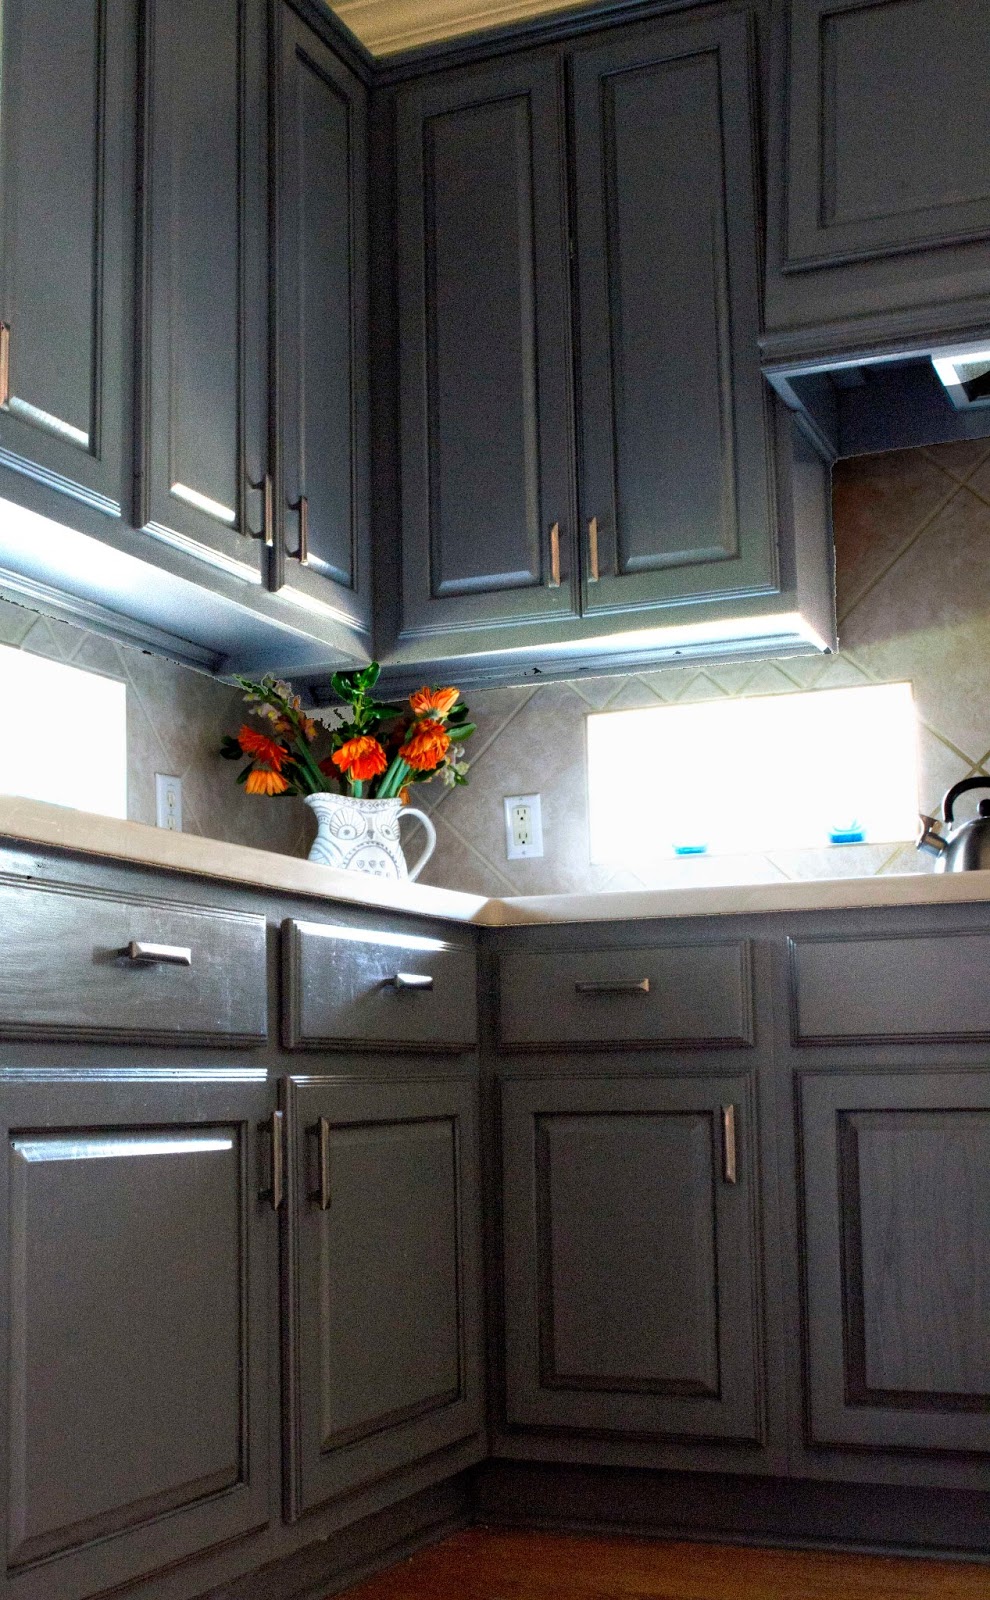


D.I.Y. Updated Kitchen Cabinets- Part 1 The FAIL

Our kitchen cabinets took 4 years to complete from start to finish; the project is a preschooler. We had a lot of ups and downs...ok more downs...when it came to refinishing our cabinets. I am by no means an expert, but I can simply give you a few tips to keep you from wasting your time, beating your head against a wall, and resenting your spouse. :)
When we started our journey, we had just moved into our new house that had the 90's honey oak cabinets and wood floors {yes they matched}. Having stained a few pieces of furniture in my day, I suggested we stain the cabinets darker to bring them into this decade and at least differentiate them from the floors. I began sanding the cabinets with a circular sander since there was so much surface area to cover.
DON'T: Don't use a circular sander to sand when staining...you must sand WITH the grain of the wood or you will see it! Oops...
I had bought a gel stain in dark walnut; I love gel stains because of their ability to coat evenly. However, when I began applying I realized that it was not coating evenly at all. The problem: we had factory-grade, spec home cabinets. Instead of being coated with a polyurethane clear coat, they were coated with a lacquer. Do you know how hard it is to get lacquer off?! They were also made with cheap wood on the sides, another type for the wall cabinets, and another for the doors.
TIP: Stain soaks into different types/qualities of wood differently. Gel stain can be applied over a clear coat without sanding, and although it will not become as dark as it would if it was applied directly to the wood, it will at least coat more evenly.
LESSON LEARNED: Staining an entire kitchen is much HARDER than a single piece of furniture...unless you are super confident, you may just want to hire a professional.

To fix our mistakes and re-stain our small-ish kitchen would cost us $2,000 by a professional. The cost wasn't too bad for an updated kitchen, but it was more than this DIY-er could afford at the moment. We went without cabinet doors for a year while we tried to fix each one ourselves....then out of shear frustration we gave up and just put them back on as is. I took about 6 months to lick my creative wounds and mentally scheme up another plan.


Stamp this as a D.I.Y. FAIL! Part 2 is much happier ending with prettier pictures...
My Blog Commitment...
I am currently trying to find a "real person" job again...but while I do that {and just in case it doesn't fall from the heavens}...I am blogging, selling Rodan + Fields, starting a 24 Day Challenge {more about that later}, scheming about my dream career, painting paintings for the random people that want one every now and then, re-doing my house, re-finishing furniture for myself and others, and oh ya there is the small responsibility of raising my smiley, little boy!
Part of me tells myself to start knocking things off my plate so I can be better at each, but I am doing each of those because they are all my passion at the moment. Matt reads a ton of books {his night stand is starting to look like a library stack and I can't stand it}, and in one they said that if you dedicate your whole life to one thing alone {and identify yourself through it}, with no balance, whenever that "thing" changes or falls through, you can go through a major identity crisis.
That would be me....
I was in design school for 8 years! 8 years people! I could be a freakin' doctor, but instead I am in an unstable field in a shaky economy! I am now realizing that the dreams that got me through school do not have to stay the same throughout my life. Dreams Evolve! So I'm continuing to figure out my next dream...
I will always love design...ALWAYS! I am always thinking creatively, and Matt sometimes hates that. This brings me to my blog commitment...I have 2 chairs I got for $10 before I got pregnant. They have been sitting in my garage the whole time. My bff and I challenged each other to refinish a piece of furniture by the 15th of April. I'm pretty sure she did 2 pieces by then {with 2 kids}. I was able to clean up the chairs, then company came over and they were moved to the garage where they have sat for a week. I also have a bathroom wall to finish detailing.

Lord help me!
I started it almost 2 years ago and it is not finished. Honestly, I sort of want to redo the whole idea now, but Matt would chase me down the street with a wooden spoon if I did that! So my blog commitment is to finish the bathroom and most of the chairs {besides the upholstered seat if it gives me trouble} within the next 2 weeks!

Hold me accountable people! Man, just typing that makes me nervous.
I'm working smarter, not harder....
D.I.Y. Dipped Barstool

When we moved into our house they were too short for our bar and falling apart, but we had to save up for almost 3 years before we found our current bar stools. As soon as the new stools came in Matt gave the old ones to Goodwill {or tossed them and lied to me}...he hated them! I convinced him to let me keep one of the nicer stools, under our desk area in the kitchen, because it is just so dang useful when I need to reach something up high.
However, over time it became scratched up and had paint dripped on it from some crazy artsy person in our house ;). Sooo, when I was priming Abram's laminate bookshelf I decided to prime the stool as well to give it a fresh look. I wanted the paint to last a little longer this time...
Supplies:
- Stool or chair
- Putty to fill holes
- Clear Glaze (OPTIONAL)
- Paint rag {damp and dry} to wipe
- Clear Polyurethane
- Gloves
- Plastic to protect surrounding areas
Fill in the scratches, sand them down, and wiped the stool with a damp cloth.

Next choose your paint color for the majority of the stool; I used a Custom White Valspar Semi-Gloss that I had left over from another project. I used a better quality brush to paint 2-3 coats. {Lightly sanding in-between}
* Again, you MUST wait the required amount of time for any primer or paint {on back of can} to cure in between coats or the finished piece will be sticky and might even peel...and it will never really go away.


Step 5: (OPTIONAL)
If you want it to look even more antique, use this glazing tutorial I used on the dresser {like I did in the pic below}.

Step 6:
After the paint cures {and glaze}, tape off where you want the "dipped" paint to stop. Then just paint the area where the dipped color will be...two coats. I used a mix of a black/brown custom paint {first coat} and a copper enamel paint {1-2 coats} I already had from painting a fleur de lis painting I did for my mom.{creates a distressed look to go with my stool}. I also peeled off the tape before the last coat of paint completely dried...about 10 minutes after painting. The reason is because I have found some latex paints like to peel once dry when you try and peel off the tape.

TIP: If you are having issues with the dipped paint bleeding behind the tape, simply paint a coat of the base color before painting the dipped color. This should help to create a barrier against the line of the tape.


Step 7:
To make sure everything stays protected and in place, I did a final coat of Polyurethane clear coat, in Satin finish...always put a clear coat on furniture and cabinets.
TIP: Make sure the clear coat you choose does not yellow over time, especially if you are using white/light paint.


- Base paint is a custom Valspar Semi-Gloss
- Glaze from Lowes mixed with a sample of customized black valspar paint
- Dipped is custom black/brown, followed by Liquitex Glossie, Copper Enamel {from Hobby Lobby}
- Polyurethane water-based clear coat in Satin (because I wanted to reduce the shine of my paint)
Glad I finally got to try out the dipping technique; I think it is a cool spin on the traditional looking stool. Also, if you like my cabinets {besides the mess on them}, stay tuned, I am typing up a two-part post of the process that took me 2 years to complete. I'll save you a lot of time! We finally got the gusto to finish when I got pregnant...procrastinators.
Free Boy Printable!


I decided not to frame mine, and instead bought an 8 x 10 canvas and printed the image 3 times onto card stock. One print is for the front, one is used to cut the long sides from, and the other is to cut the short sides from. I just measured the thickness of the canvas and cut the edges off of the print to create a matching distressed looking side. I then used modge podge on the back to apply it all to the canvas. If you do want to apply the modge podge to the front, don't print from an inkjet or the ink will smear.

D.I.Y. Antiqued Dresser

I needed a long dresser to double as a changing table for the nursery so I started my hunt on craigslist for an old one, with the intention of painting it a color to bring it back to life. I found several candidates, but the price wasn't worth the work I would put in. Then I found a dresser & nightstand set that was already painted grey and was a great price. Score for the tired, pregnant woman with swollen feet, who did not feel like painting anymore!

The problem was I had already painted his walls a grey-blue so the dresser blended in too much. Luckily, I had some extra black glaze left over from our kitchen cabinet makeover {tutorial coming soon}. It only took a couple hours and made it look a little darker and rustic.... just perfect for the little boy's room!
P.S. If I had painted it, I would have followed the same steps in this tutorial to ensure it would be durable. If you would want to paint and antique, just don't put on the polyurethane sealant until AFTER you antique. Oh and the handles are spray painted which is simple as long as you do several, thin coats. If you hold the can too close and get the paint clumpy, you will need to strip the handles and start over.
Oh and there are several ways to create different antiqued looks, this is just one way that I have found to be pretty easy.
Supplies:
- furniture of your choice
- Paint colors of your choice to mix with the glaze
- Clear Glaze
- Paint rag {damp and dry} to wipe
- Clear Polyurethane
- Gloves
- Plastic to protect surrounding areas

Step 1:
I bought one container of clear glaze and mixed the amount directed with a sample size of the Valspar color I chose. The color I used was almost black because I wanted the glazed color to darken the dresser considerably.
TIP: The more glaze you mix with the paint, the thinner it will be when applied...the less glaze you use with the paint, the thicker it will go on and less it will wipe off.


Step 3:
After a couple minutes begin wiping the glazed area with a dry cloth until you get the look you want. You can add multiple layers to darken the glaze if needed.
TIP: Experiment with a small section (maybe hidden) to see what affect you want...keep a damp cloth with you to wipe off immediately if you don't like it. The longer you wait to wipe the glaze, the more the glaze stays on.


Step 4:
To make sure everything stays in place, I did a final coat of Polyurethane clear coat, in Satin finish...always put a clear coat on furniture and cabinets.
TIP: Make sure the clear coat you choose does not yellow over time, especially if you are using white/light paint.

- Glaze from Lowes mixed with a sample of customized black valspar paint
- Polyurethane water-based clear coat in Satin (because I wanted to reduce the shine of my paint)

How to add character to a hanging lamp

When I was designing the look of Abram's nursery I really wanted a light by the rocking chair to create a reading area. Unfortunately there was no spot for a lamp, so I decided to do a hanging one.
First of all, I love that I could create it for pretty cheap since Ikea is for frugal people like me. It also took up no counter space and could not be knocked over and broken by little boys {I may have to raise it later to avoid Tarzan reenactments though}. Best of all, I finally had a use for my Joel Dewberry fabric that I fell in love with and bought before I was even pregnant!


Supplies:
- Ikea lamp shade or other shade that can be hung
- Ikea hanging lamp (basically just the white cord with bulb attachment and a plug in)
- fabric of your choice (the amount depends on the size of the shade)
- spray adhesive
- scissors
- twine or other rope, string, yarn, etc
- hot glue gun
Shade:
My mom covered the lamp shade for me to help me save time. I told her to take pics while she worked so I could do a tutorial, but she failed me which is why that crafty little woman doesn't have her own blog. Tisk tisk Deb. Luckily, I found a similar tutorial from another amazing DIY'ers blog who remembers to take pics! Check it out here: Cover a lampshade


Cord:
Super super easy...I just wanted to cover the white plastic and and electrical numbers with out a girly, bunched fabric. I used twine and simply wrapped it around the cord; hot gluing it on both ends. I did not get the glue on the cord, just the twine itself. I tucked the rest behind the drapes, but it could be wrapped all the way if needed. Using a bright colored string/yarn for a child's room or playroom might be fun!
